Single server with containers
A single server installation is being considered a non-production installation. For a production installation some kind of orchestration should be applied. A single server installation of FOLIO is useful for demo and testing purposes.
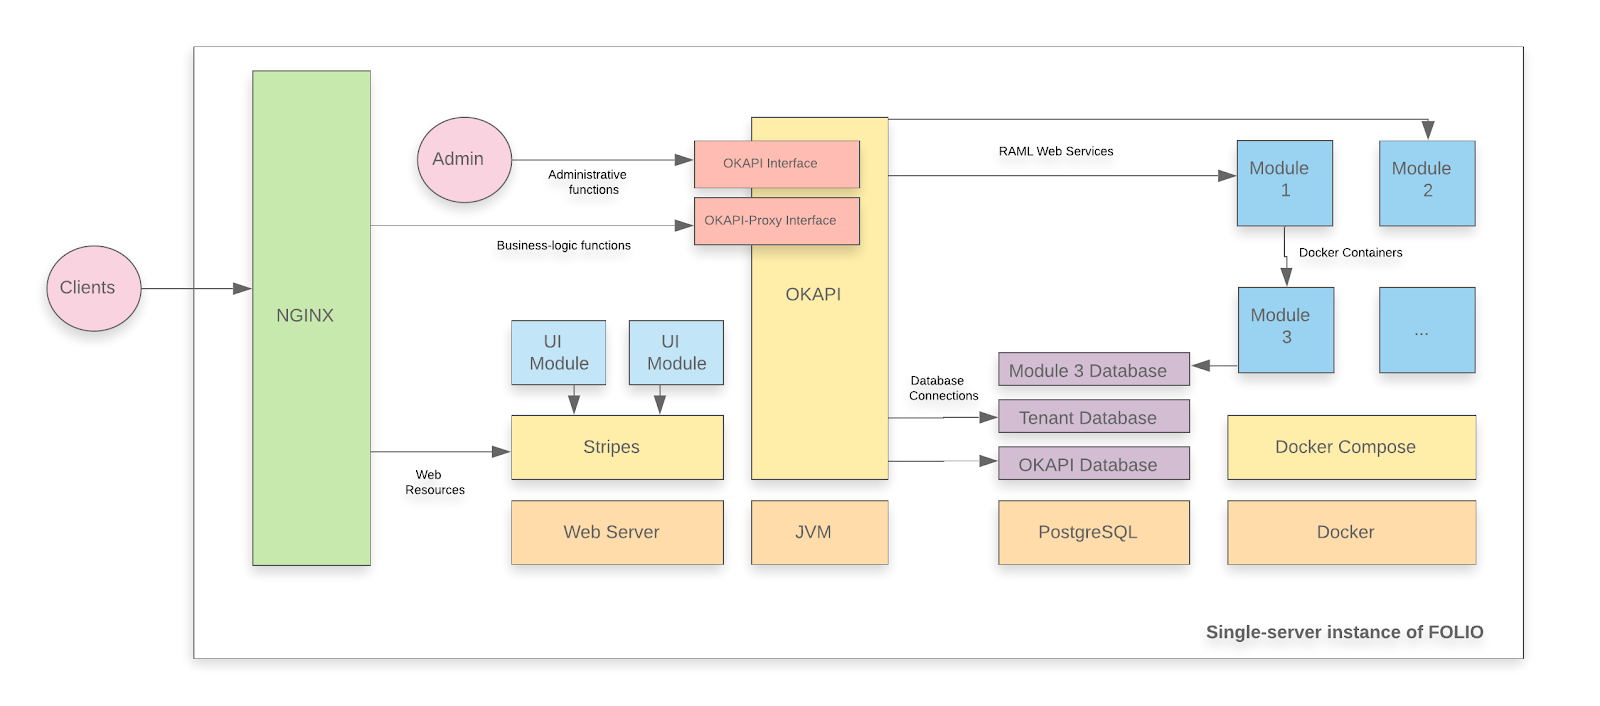
A FOLIO instance is divided into two main components. The first component is Okapi, the gateway. The second component is the UI layer which is called Stripes. The single server with containers installation method will install both.
System requirements
Software requirements
| Requirement | Recommended Version |
|---|---|
| Operating system | Ubuntu 20.04.02 LTS (Focal Fossa) 64-bits |
| Java | OpenJDK 11 |
| PostgreSQL | PostgreSQL 12 |
Hardware requirements
| Requirement | FOLIO Base Apps | FOLIO Extended Apps |
|---|---|---|
| RAM | 24GB | 40GB |
| CPU | 4 | 8 |
| HD | 100 GB SSD | 350 GB SSD |
Installing Okapi
Okapi requirements
- Update the APT cache.
sudo apt update
- Install Java 11 and verify that Java 11 is the system default.
sudo apt -y install openjdk-11-jdk
sudo update-java-alternatives --jre-headless --jre --set java-1.11.0-openjdk-amd64
- Import the PostgreSQL signing key, add the PostgreSQL apt repository and install PostgreSQL.
wget --quiet -O - https://www.postgresql.org/media/keys/ACCC4CF8.asc | sudo apt-key add -
sudo add-apt-repository "deb http://apt.postgresql.org/pub/repos/apt/ focal-pgdg main"
sudo apt update
sudo apt -y install postgresql-12 postgresql-client-12 postgresql-contrib-12 libpq-dev
- Configure PostgreSQL to listen on all interfaces and allow connections from all addresses (to allow Docker connections).
- Edit the file /etc/postgresql/12/main/postgresql.conf to add line listen_addresses = ‘*' in the “Connection Settings” section.
- In the same file, increase max_connections (e.g. to 500)
- Edit the file /etc/postgresql/12/main/pg_hba.conf to add line host all all 0.0.0.0/0 md5
- Restart PostgreSQL with command sudo systemctl restart postgresql
- Import the Docker signing key, add the Docker apt repository and install the Docker engine.
sudo apt -y install apt-transport-https ca-certificates gnupg-agent software-properties-common
wget --quiet -O - https://download.docker.com/linux/ubuntu/gpg | sudo apt-key add -
sudo add-apt-repository "deb https://download.docker.com/linux/ubuntu $(lsb_release -cs) stable"
sudo apt update
sudo apt -y install docker-ce docker-ce-cli containerd.io
- Configure Docker engine to listen on network socket.
- Create a configuration folder for Docker if it does not exist.
sudo mkdir -p /etc/systemd/system/docker.service.d
- Create a configuration file /etc/systemd/system/docker.service.d/docker-opts.conf with the following content.
[Service]
ExecStart=
ExecStart=/usr/bin/dockerd -H fd:// -H tcp://127.0.0.1:4243
- Restart Docker.
sudo systemctl daemon-reload
sudo systemctl restart docker
- Install docker-compose.
Follow the instructions from official documentation for docker. The instructions may vary depending on the architecture and operating system of your server, but in most cases the following commands will work.
sudo curl -L \
  "https://github.com/docker/compose/releases/download/1.27.4/docker-compose-$(uname -s)-$(uname -m)" \
  -o /usr/local/bin/docker-compose
sudo chmod +x /usr/local/bin/docker-compose
- Install Apache Kafka and Apache ZooKeeper. Apache Kafka and Apache ZooKeeper are required by FOLIO mod-pubsub. Both Kafka and ZoopKeepr are installed below using docker-compose.
Take into account that you have to change the KAFKA_ADVERTISED_LISTENERS value for the private IP of your server, instead of 10.0.2.15 for a Vagrant box.
mkdir ~/folio-install
cd folio-install
vim docker-compose-kafka-zk.yml
Insert this content into the file. Change the IP Address in KAFKA_ADVERTISED_LISTENERS to the local IP of your server on which you run Kafka:
version: '2'
services:
  zookeeper:
    image: wurstmeister/zookeeper
    container_name: zookeeper
    restart: always
    ports:
      - "2181:2181"
  kafka:
    image: wurstmeister/kafka
    container_name: kafka
    restart: always
    ports:
      - "9092:9092"
      - "29092:29092"
    environment:
      KAFKA_LISTENERS: INTERNAL://:9092,LOCAL://:29092
      KAFKA_ADVERTISED_LISTENERS: INTERNAL://<YOUR_IP_ADDRESS>:9092,LOCAL://localhost:29092
      KAFKA_LISTENER_SECURITY_PROTOCOL_MAP: LOCAL:PLAINTEXT,INTERNAL:PLAINTEXT
      KAFKA_INTER_BROKER_LISTENER_NAME: INTERNAL
      KAFKA_AUTO_CREATE_TOPICS_ENABLE: "true"
      KAFKA_ZOOKEEPER_CONNECT: zookeeper:2181
      KAFKA_BROKER_ID: 1
      KAFKA_LOG_RETENTION_BYTES: -1
      KAFKA_LOG_RETENTION_HOURS: -1
Note: The IP address <YOUR_IP_ADDRESS> should match the private IP of your server. This IP address should be reachable from Docker containers. Therefore, you can not use localhost. You can use the /ifconfig command in order to determine the private IP.
sudo mkdir /opt/kafka-zk
sudo cp ~/folio-install/docker-compose-kafka-zk.yml /opt/kafka-zk/docker-compose.yml
cd /opt/kafka-zk
sudo docker-compose up -d
Create a database and role for Okapi
You will need to create one database in PostgreSQL to persist the Okapi configuration.
- Log into the PostgreSQL server as a superuser.
sudo su -c psql postgres postgres
- Create a database role for Okapi and a database to persist Okapi configuration.
CREATE ROLE okapi WITH PASSWORD 'okapi25' LOGIN CREATEDB;
CREATE DATABASE okapi WITH OWNER okapi;
- Create a database role and database to persist tenant data.
CREATE ROLE folio WITH PASSWORD 'folio123' LOGIN SUPERUSER;
CREATE DATABASE folio WITH OWNER folio;
- Exit psql with \q command
Install and configure Okapi
Once you have installed the requirements for Okapi and created a database, you can proceed with the installation. Okapi is available as a DEB package that can be easily installed in Debian-based operating systems. You only need to add the official APT repository to your server.
- Import the FOLIO signing key, add the FOLIO apt repository and install okapi.
wget --quiet -O - https://repository.folio.org/packages/debian/folio-apt-archive-key.asc | sudo apt-key add -
sudo add-apt-repository "deb https://repository.folio.org/packages/ubuntu focal/"
sudo apt update
sudo apt-get -y --allow-change-held-packages install okapi=4.8.2-1 # R2-2021 Okapi version
sudo apt-mark hold okapi
Please note that the R2-2021 FOLIO release version of Okapi is 4.8.2-1. If you do not explicitly set the Okapi version, you will install the latest Okapi release. There is some risk with installing the latest Okapi release. The latest release may not have been tested with the rest of the components in the official release.
- Configure Okapi to run as a single node server with persistent storage.
- Edit file /etc/folio/okapi/okapi.conf to reflect the following changes:
role="dev"
port_end="9340"
host="<YOUR_IP_ADRESS>"
storage="postgres"
okapiurl="http://<YOUR_IP_ADDRESS>:9130"
docker_registries -- See explanation in okapi.conf file. Default is unauthenticated.
Note: The properties postgres_host, postgres_port, postgres_username, postgres_password, postgres_database should be configured in order to match the PostgreSQL configurations made previously.
- Restart Okapi
sudo systemctl daemon-reload
sudo systemctl restart okapi
The Okapi log is at /var/log/folio/okapi/okapi.log.
- Pull module descriptors from the central registry.
A module descriptor declares the basic module metadata (id, name, etc.), specifies the module’s dependencies on other modules (interface identifiers to be precise), and reports all “provided” interfaces. As part of the continuous integration process, each Module Descriptor is published to the FOLIO Registry at https://folio-registry.dev.folio.org.
curl -w '\n' -D - -X POST -H "Content-type: application/json" \
  -d @registry.json \
  http://localhost:9130/_/proxy/pull/modules
The content of registry.json should look like this:
{
  "urls": [
    "https://folio-registry.dev.folio.org"
  ]
}
Okapi is up and running!
Create a new tenant
- Post the tenant initialization to Okapi.
curl -w '\n' -D - -X POST -H "Content-type: application/json" \
  -d @tenant.json \
  http://localhost:9130/_/proxy/tenants
The content of tenant.json:
{
  "id" : "diku",
  "name" : "Datalogisk Institut",
  "description" : "Danish Library Technology Institute"
}
Note: In this installation guide, the Datalogisk Institut is used as an example, but you should use the information for your organization. Take into account that you have to use the id of your tenant in the next steps.
- Enable the Okapi internal module for the tenant
curl -w '\n' -D - -X POST -H "Content-type: application/json" \
  -d '{"id":"okapi"}' \
  http://localhost:9130/_/proxy/tenants/diku/modules
Install a Folio Backend
- Post data source information to the Okapi environment for use by deployed modules.
curl -w '\n' -D - -X POST -H "Content-Type: application/json" -d "{\"name\":\"DB_HOST\",\"value\":\"<YOUR_IP_ADDRESS>\"}" http://localhost:9130/_/env
curl -w '\n' -D - -X POST -H "Content-Type: application/json" -d "{\"name\":\"DB_PORT\",\"value\":\"5432\"}" http://localhost:9130/_/env
curl -w '\n' -D - -X POST -H "Content-Type: application/json" -d "{\"name\":\"DB_DATABASE\",\"value\":\"folio\"}" http://localhost:9130/_/env
curl -w '\n' -D - -X POST -H "Content-Type: application/json" -d "{\"name\":\"DB_USERNAME\",\"value\":\"folio\"}" http://localhost:9130/_/env
curl -w '\n' -D - -X POST -H "Content-Type: application/json" -d "{\"name\":\"DB_PASSWORD\",\"value\":\"folio123\"}" http://localhost:9130/_/env
curl -w '\n' -D - -X POST -H "Content-Type: application/json" -d "{\"name\":\"KAFKA_HOST\",\"value\":\"<YOUR_IP_ADDRESS>\"}" http://localhost:9130/_/env
curl -w '\n' -D - -X POST -H "Content-Type: application/json" -d "{\"name\":\"KAFKA_PORT\",\"value\":\"9092\"}" http://localhost:9130/_/env;
curl -w '\n' -D - -X POST -H "Content-Type: application/json" -d "{\"name\":\"OKAPI_URL\",\"value\":\"http://<YOUR_IP_ADDRESS>:9130\"}" http://localhost:9130/_/env
curl -w '\n' -D - -X POST -H "Content-Type: application/json" -d "{\"name\":\"SYSTEM_USER_PASSWORD\",\"value\":\"<YOUR_SYSTEM_USER_PASSWORD>\"}" http://localhost:9130/_/env
Note: Make sure that you use your private IP for the properties DB_HOST, KAFKA_HOST and OKAPI_URL.
- Decide if you would like to use platform-core or platform-complete for your tenant and clone the repository. The tenant is now ready to add some Apps.
The App installation process is similar for platform-core and platform-complete. You have to clone one of these github repositories: https://github.com/folio-org/platform-core or https://github.com/folio-org/platform-complete.
In this installation guide, the ‘platform-core’ repository will be used. If you would like to install ‘platform-complete’ you should replace every mention of platform-core with platform-complete in the instructions.
- Clone the repository
git clone https://github.com/folio-org/platform-core
cd platform-core
- Checkout a stable branch of the repository
git checkout R2-2021
Elasticsearch support
Elasticsearch support is being included in R2-2021 (Juniper) as a proof of concept. If you plan to use Elasticsearch queries in production, please choose a FOLIO flower version higher than Juniper. In Juniper, you can test FOLIO connecting and querying to Elasticsearch, but Juniper does not cover the full search capabilities in Elasticsearch as it does for CQL queries. If you plan to use Juniper in production, use the frontend module folio_inventory and don’t use the frontend module folio_inventory-es. folio_inventory does not send queries to Elasticsearch.
If you would like to build with ES, you have to install elasticsearch on your server and point the related modules, at least mod_pubsub and mod_search, to your Installation.
Here is a prescription how to install ES under Ubuntu 18.04 : https://phoenixnap.com/kb/install-elasticsearch-ubuntu
To point the modules to your Okapi installation, the environment parameters of those modules need to be set for the module/container when it spins up, so it can connect to the ES instance. You can find out the env params by looking at the Overview - Metadata section of the module’s page in Folio org’s Dockerhub. For mod-search, this is at https://hub.docker.com/r/folioorg/mod-search.
The env params need to be set in the launch descriptor of the module, before you deploy the module. The launch descriptor is a part of the module descriptor. To set an env param in the launch descriptor of a module, follow the prescription described below for mod-pubsub.
If you want to build without Elasticsearch, do the following: cd platform-core
- Remove @folio/inventory-es and @folio/search from stripes.config.js
- Remove mod-search, folio_search and folio_inventory-es entries from install.json
- Remove mod-search from okapi-install.json
- Remove folio_inventory-es and folio_search from stripes-install.json
- Remove @folio/inventory-es and @folio/search from package.json
Deploy mod-pubsub and configure connection to the mesasage broker Kafka
mod-pubsub is the Folio module which implements a message queue. It needs to connect to the message broker Kafka which we installed above using docker-compose. You have to set the env params KAFKA_HOST and OKAPI_URL of mod-pubsub, so it can connect. You can do this like this:
  cd ~/folio-install
  curl -X GET -o mod-pubsub-2.3.3-module-descriptor.json -D - -w '\n' http://localhost:9130/_/proxy/modules/mod-pubsub-2.3.3
Edit the following part of pubsub-module-descriptor.json :
    }, {
      "name" : "KAFKA_HOST",
      "value" : "<YOUR_IP_ADDRESS>"
    }, {
      "name" : "KAFKA_PORT",
      "value" : "9092"
    }, {
      "name" : "OKAPI_URL",
      "value" : "http://<YOUR_IP_ADDRESS>:9130"
    }, {
      "name" : "SYSTEM_USER_PASSWORD",
      "value" : "<YOUR_SYSTEM_USER_PASSWORD>"
    } ],
<YOUR_SYSTEM_USER_PASSWORD> has to be the same one as we set in the Okapi environment variables above.
Delete the standard module descriptor and post your own module descriptor to Okapi:
  curl -X DELETE -D - -w '\n' http://localhost:9130/_/proxy/modules/mod-pubsub-2.3.3
  curl -i -w '\n' -X POST -H 'Content-type: application/json' -d @pubsub-module-descriptor.json http://localhost:9130/_/proxy/modules
You have to set the KAFKA_HOST variable also in the launch descriptor of the following modules, because these modules also talk directly to Kafka:
- mod-data-import
- mod-data-export-spring
- mod-data-export-worker
- mod-ebsconet
- mod-inventory
- mod-inventory-storage
- mod-invoice
- mod-quick-marc
- mod-remote-storage
- mod-source-record-manager
- mod-source-record-storage
- mod-feesfines (add KAFKA_HOST and KAFKA_PORT variables to the launch descriptor)
You can look up the R2-2021 module versions in okapi-install.json. Apply the same steps as for the module descriptor of mod-pubsub to these modules, but change only the value of KAFKA_HOST. If you are installing plaform-core, some of these modules may not be part of that distribution, so you don’t have to set KAFKA_HOST for them.
- Deploy and enable the backend modules.
Deploy the backend modules
Deploy the backend modules one by one. This will pull the Docker image from Docker Hub and spin up a container on your host for each backend module.
Download these files to a local folder: deploy-backend-module.sh, deploy-all-backend-modules.sh .
Then execute the file deploy-all-backend-modules.sh to deploy all backend modules, one after the other, on your host:
./deploy-all-backend-modules.sh ~/platform-core/okapi-install.json <YOUR_IP_ADDRESS>
Progress can be followed in the Okapi log at /var/log/folio/okapi/okapi.log
Check, what is in your Discovery:
curl -w '\n' -D - http://localhost:9130/_/discovery/modules | grep srvcId
There should be 61 modules in your Okapi discovery - those which are in okapi-install.json.
Check, what Docker containers are running on your host:
docker ps --all | wc
This should show the number 64 : The 61 backend modules, Kafka, Zookeeper + the header line.
Now the backend modules are deployed, but not yet enables for your tenant.
Enable the backend modules for your tenant
Post the list of backend modules to Okapi to enable them for your tenant. Also, you can set the (tenantParameters)[https://github.com/folio-org/okapi/blob/master/doc/guide.md#install-modules-per-tenant] to load their sample and reference data.
First do a simulation run:
curl -w '\n' -D - -X POST -H "Content-type: application/json" -d @$HOME/platform-core/okapi-install.json http://localhost:9130/_/proxy/tenants/diku/install?simulate=true\&preRelease=false
Note: You will have to replace ‘diku’ with the id of your tenant.
Decide whether you want to load a set of sample data (inventory: bibs, holdings and items) or not. If you want to load sample data, then change the value of “loadSample” from “false” to “true” in the following command line. Then execute this command line:
curl -w '\n' -D - -X POST -H "Content-type: application/json" -d @$HOME/platform-core/okapi-install.json http://localhost:9130/_/proxy/tenants/diku/install?deploy=false\&preRelease=false\&tenantParameters=loadReference%3Dtrue%2CloadSample%3Dfalse
Finally, check which backend modules have been enabled for your tenant:
curl -w '\n' -XGET http://localhost:9130/_/proxy/tenants/diku/modules | grep "id"
This should show the same set of modules as in okapi-install.json plus the Okapi module itself. Thus, the number of modules enabled for your tenant should be 62.
The backend of the new tenant is ready. Now, you have to set up a Stripes instance for the frontend of the tenant, create a superuser for the tenant and secure Okapi.
Install the frontend, Folio Stripes
You have an Okapi instance running, you can proceed to install Stripes. Stripes is bundled and deployed on a per tenant basis. Install Stripes and nginx in a Docker container.
Configure the docker file and the nginx webserver
  cd ~/platform-core
  edit docker/Dockerfile
    ARG OKAPI_URL=http(s)://<YOUR_DOMAIN_NAME>/okapi
    ARG TENANT_ID=diku # Or change to your tenant's name
Use https if possible, i.e. use an SSL certificate. <YOUR_DOMAIN_NAME> should then be the fully qualified domain name (FQDN) for which your certificate is valid, or a server alias name (SAN) which applies to your certificate. If using http, it is your server name (host name plus domain). The subpath /okapi of your domain name will be redirected to port 9130 below, in your nginx configuration.
  edit docker/nginx.conf
server {
  listen 80;
  server_name <YOUR_SERVER_NAME>;
  charset utf-8;
  access_log  /var/log/nginx/host.access.log  combined;

  # front-end requests:
  # Serve index.html for any request not found
  location / {
    # Set path
    root        /usr/share/nginx/html;
    index       index.html index.htm;
    include mime.types;
    types {
      text/plain lock;
    }
    try_files $uri /index.html;
  }

  # back-end requests:
  location /okapi {
    rewrite ^/okapi/(.*) /$1 break;
    proxy_pass http://<YOUR_IP_ADDRESS>:9130/;
  }
}
<YOUR_SERVER_NAME> should be the real name of your server in your network. <YOUR_SERVER_NAME> should consist of host name plus domain name, e.g. myserv.mydomain.edu.
If you want your FOLIO installation to be accessed from outside of your network, it is highly recommended to use https instead of http. In this case, your nginx.conf might look like this:
edit docker/nginx.conf
server {
 listen 443 ssl;
 server_name  <YOUR_SERVER_NAME>;
 ssl on;
 ssl_certificate     cert_bundle.crt;
 ssl_certificate_key <YOUR_SERVER_NAME>-key.no_enc.pem;
 ssl_protocols       TLSv1 TLSv1.1 TLSv1.2;
 ssl_prefer_server_ciphers on;
 ssl_ciphers         HIGH:!aNULL:!MD5;

 charset utf-8;
 access_log  /var/log/nginx/host.access.log  combined;

 # front-end requests:
 # Serve index.html for any request not found
 location / {
   # Set path
   root        /usr/share/nginx/html;
   index       index.html index.htm;
   include mime.types;
   types {
     text/plain lock;
   }
   try_files $uri /index.html;
 }

 # back-end requests:
 location /okapi {
   rewrite ^/okapi/(.*) /$1 break;
   proxy_pass http://<YOUR_IP_ADDRESS>:9130/;
 }

}
The subpath /okapi of your domain is being redicrectd to your internal port 9130. Thus, the Okapi port 9130 does not need to be released to outside of your network. Note: If you want to host multiple tenants on a server, you can configure NGINX to either open a new port for each tenant or set up different paths on the same port (e.g. /tenat1, /tenant2).
Edit the url and tenant in stripes.config.js. The url will be requested by a FOLIO client, thus a browser. Make sure that you use the public IP or domain of your serve. Use http only if you want to access your FOLIO installation only from within your network.
  edit stripes.config.js
      okapi: { 'url':'http(s)://<YOUR_DOMAIN_NAME>/okapi', 'tenant':'diku' },

      # remove this line, unless you are installing Elasticsearch :
          '@folio/search' : {},
You might also edit branding in stripes.config.js, e.g. add your own logo and favicon as desired. Edit these lines:
  branding: {
    logo: {
      src: './tenant-assets/mybib.gif',
      alt: 'My Folio Library',
    },
    favicon: {
      src: './tenant-assets/mybib_icon.gif'
    },
  }
Build the Docker container
  sudo su
  docker build -f docker/Dockerfile --build-arg OKAPI_URL=http(s)://<YOUR_DOMAIN_NAME>/okapi --build-arg TENANT_ID=diku -t stripes .
Sending build context to Docker daemon  1.138GB
Step 1/19 : FROM node:15-alpine as stripes_build
...
Step 19/19 : ENTRYPOINT ["/usr/bin/entrypoint.sh"]
 ---> Running in a47dce4e3b3e
Removing intermediate container a47dce4e3b3e
 ---> 48a532266f21
Successfully built 48a532266f21
Successfully tagged stripes:latest
This will run for quite a long time, approx. 15 minutes.
Start the Docker container
Make sure nginx is not already running on your VM (do sudo service nginx stop). Make sure nothing else is running on port 80.
Redirect port 80 from the outside to port 80 of the docker container. When using SSL, port 443 has to be redirected.
nohup docker run -d -p 80:80 stripes
Log in to the Docker container
Check if your config file looks o.k. and follow the access log inside the container:
  docker exec -it <container_id> sh
  vi /etc/nginx/conf.d/default.conf

  tail -f /var/log/nginx/host.access.log
Post the list of Stripes modules to enable for your tenant.
First, simulate what will happen:
curl -w '\n' -D - -X POST -H "Content-type: application/json" -d @stripes-install.json http://localhost:9130/_/proxy/tenants/diku/install?simulate=true\&preRelease=false
Then, enable the frontend modules for your tenant:
curl -w '\n' -D - -X POST -H "Content-type: application/json" -d @stripes-install.json http://localhost:9130/_/proxy/tenants/diku/install?preRelease=false
50 Stripes modules (folio/*) and 9 Edge modules have been enabled.
Create a superuser
You need to create a superuser for the newly created tenant. This is a multi step process and the details can be found in the (Okapi documentation) [https://github.com/folio-org/okapi/blob/master/doc/guide.md#securing-okapi]. You can use a PERL script to execute these steps automatically. You only need to provide the tenant id, a username/password for the superuser and the URL of Okapi.
Install gcc on Ubuntu 20 (prerequisite to install Perl modules from cpan)
sudo apt install gcc
gcc --version
gcc (Ubuntu 9.3.0-17ubuntu1~20.04) 9.3.0
Install prerequiste Perl modules
sudo cpan install LWP.pm
sudo cpan install JSON.pm
sudo cpan install UUID::Tiny
Use this Perl script to create a superuser [https://github.com/folio-org/folio-install/blob/master/runbooks/single-server/scripts/bootstrap-superuser.pl ]. Use the version of the script which is applicable for mod-permissions of version < 5.15.0 :
wget "https://raw.githubusercontent.com/folio-org/folio-install/b2e75a058f6d821c4cc04f711aeb0d8dbab06f80/runbooks/single-server/scripts/bootstrap-superuser.pl"
perl bootstrap-superuser.pl \
  --tenant diku --user diku_admin --password admin \
  --okapi http://localhost:9130
Now Stripes is running on port 80 or 443 and you can open it using a browser. Log in with the credentials of the superuser that you have created.
Secure Okapi
By default, Okapi API is open in order to facilitate the deployment process of FOLIO. However, in a production environment you must enable the security checks. You can use a Python script to secure Okapi, you should provide a username and password for Okapi.
python3 secure-supertenant.py -u USERNAME -p PASSWORD -o http://localhost:9130
The script can be downloaded (here)[https://github.com/folio-org/folio-install/blob/master/runbooks/single-server/scripts/secure-supertenant.py].
When Okapi is secured, you must login using mod-authtoken to obtain an authtoken and include it in the x-okapi-token header for every request to the Okapi API. For example, if you want to repeat any of the calls to Okapi in this guide, you will need to include x-okapi-token:YOURTOKEN and x-okapi-tenant:supertenant as headers for any requests to the Okapi API.
Install and serve edge modules (platform-complete only)
The Edge modules bridge the gap between some specific third-party services and FOLIO (e.g. RTAC, OAI-PMH). In these FOLIO reference environments, the set of edge services are accessed via port 8000. In this example, the edge-oai-pmh will be installed.
You can find more information about the Edge modules of FOLIO in the Wiki https://wiki.folio.org/display/FOLIOtips/Edge+APIs.
- Create institutional user. An institutional user must be created with appropriate permissions to use the edge module. You can use the included create-user.py to create a user and assign permissions.
python3 create-user.py -u instuser -p instpass \
    --permissions oai-pmh.all --tenant diku \
    --admin-user diku_admin --admin-password admin
The script can be found (here) [https://github.com/folio-org/folio-install/blob/master/runbooks/single-server/scripts/create-user.py].
If you need to specify an Okapi instance running somewhere other than http://localhost:9130, then add the –okapi-url flag to pass a different url. If more than one permission set needs to be assigned, then use a comma delimited list, i.e. –permissions edge-rtac.all,edge-oai-pmh.all.
- The institutional user is created for each tenant for the purposes of edge APIs. The credentials are stored in one of the secure stores and retrieved as needed by the edge API. You can find more information about secure stores (here) [https://github.com/folio-org/edge-common#secure-stores]. In this example, a basic EphemeralStore using an ephemeral.properties file which stores credentials in plain text. This is meant for development and demonstration purposes only.
sudo mkdir -p /etc/folio/edge
sudo vi /etc/folio/edge/edge-oai-pmh-ephemeral.properties
The ephemeral properties file should look like this.
secureStore.type=Ephemeral
# a comma separated list of tenants
tenants=diku
#######################################################
# For each tenant, the institutional user password...
#
# Note: this is intended for development purposes only
#######################################################
# format: tenant=username,password
diku=instuser,instpass
- Start edge module Docker containers. You will need the version of the edge-modules available on Okapi for the tenant. You can run a CURL request to Okapi and get the version of the edge-oai-pmh module.
curl -s http://localhost:9130/_/proxy/tenants/diku/modules | jq -r '.[].id' | grep 'edge-'
- Set up a docker compose file in /etc/folio/edge/docker-compose.yml that defines each edge module that is to be run as a service. The compose file should look like this.
version: '2'
services:
  edge-oai-pmh:
    ports:
      - "9700:8081"
    image: folioorg/edge-oai-pmh:2.2.1
    volumes:
      - /etc/folio/edge:/mnt
    command:
      -"Dokapi_url=http://10.0.2.15:9130"
      -"Dsecure_store_props=/mnt/edge-oai-pmh-ephemeral.properties"
    restart: "always"
Make sure you use the private IP of the server for the Okapi URL.
- Start the edge module containers.
cd /etc/folio/edge
sudo docker-compose up -d
- Set up NGINX.
- Create a new virtual host configuration to proxy the edge modules. Create a new NGINX file in the directory /etc/nginx/sites-available/edge. This needs to be done inside your Stripes container. You might want to modify the Docker file that builds your Stripes container, then re-build and re-run the container.
server {
  listen 8130;
  server_name localhost;
  charset utf-8;

  location /oai {
    proxy_pass http://localhost:9700;
  }
}
- Link that new configuration and restart nginx (inside the Stripes container; or re-start that container).
sudo ln -s /etc/nginx/sites-available/edge /etc/nginx/sites-enabled/edge
sudo service nginx restart
Now, an OAI service is running on http://server:8130/oai .
- Follow this procedure to generate the API key for the tenant and institutional user that were configured in the previous sections. Currently, the edge modules are protected through API Keys.
cd ~
git clone https://github.com/folio-org/edge-common.git
cd edge-common
mvn package
java -jar target/edge-common-api-key-utils.jar -g -t diku -u instuser
This will return an API key that must be included in requests to edge modules. With this APIKey, you can test the edge module access. For instance, a test OAI request would look like this.
curl -s "http://localhost:8130/oai?apikey=APIKEY=&verb=Identify"
The specific method to construct a request for an edge module is documented in the developers website: https://dev.folio.org/source-code/map/ or you can refer to the github project of the edge module.
Last modified August 23, 2022